Sunday, August 30, 2009

Green Bananas

Call me crazy (ahem bananas...) but I hate ripe bananas. In fact I only eat green bananas. Now I don't mean so green that you can barely bite through them or peel them but just green enough. I find them refreshingly grassy that way and the riper they get the sweeter and worse they become. Ripe bananas are just too strong in flavor and I can't stand the mushy texture.

I have to admit, I feel quite badly about throwing away my bananas as soon as they turn a bright, bright yellow. Smelling their unpleasant sweetness while eying the trash can the other day, I thought instead to save those inedible fruits. I decided to bake banana bread!

Seldom do I have such a strong feeling to bake and actually have all of the ingredients on hand. Most of the time there is always one ingredient missing and that is what happened in the case of this bread. OK actually I was missing two ingredients.... chocolate chips and white flour. The chocolate chips are any easy omit but the flour, well I'm ashamed for not having any in my kitchen. I did however have some wheat flour stowed deep in the cabinets from a past bread experiment. So I went with the wheat and was pleasantly surprised with the results.

This comes from Molly and is so easy a monkey could mix it together (doh!). Moist and tender, and tastes best the day after.


Banana Whole Wheat Bread
adapted from Orangette

3 ripe bananas (medium or large)
2 eggs
1 ½ cups whole grain wheat flour
1 cup granulated sugar
1 tsp. baking soda
2 tsp. ground cinnamon
1 tsp. pure vanilla extract
1 cup semisweet chocolate chips (or nuts, optional)

Preheat the oven to 375. Mash the bananas in a large bowl. Add the eggs and combine. Stir in the remaining ingredients until smooth. Pour batter into a parchment-lined or oiled loaf pan. Bake for 35-40 minutes.

Thursday, August 13, 2009

The Great Cupcake Debate

How many cupcake shops does one city really need? Cupcakes have been on my mind since moving to Pittsburgh. Early on I realized that there was some debate among bloggers, locals, and the like who makes the best cupcakes in the city.

I decided to see for myself and started with Coco's in Shadyside. This shop sells cupcakes, the occasional caffeinated beverage, and is always empty when I visit. Maybe I just miss the cupcake rush hour. The best thing about Coco's is that it is walking distance from my apartment. This cuts the guilt of eating a lot of cupcakes a bit since I have to walk about 1.5 miles round trip to satisfy my needs. Coco's also has different flavors daily and seasonally so there's always something new to try. They also have vegan options on occasion.


I first tried the orange kahlua cupcake. Rich with kahlua icing and just a hint of orange in the cake.

The vegan margarita cupcake. Vanilla cupcake (I think) with a really nice lime icing. Salt may have been an interesting addition...

S'more cupcake. Chocolate cake, marshmallow-y icing, chocolate fudge, mini marshmallows, and graham cracker dust.

Peanut Butter Banana. Ripe banana cake with peanut butter icing so soft and light it melted a bit on the way home.

Coco's does cupcakes pretty well. Their flavors are adventurous and come together nicely. The s'more cupcakes taste like s'mores. The peanut butter banana tastes like peanut butter smeared on a ripe banana. The icing is never sickening but perfectly light and just sweet enough. My only complaint is the underlying cake.

The inside is dense and somewhat oily. I'd much prefer a lighter, more tender cake underneath. The cake to icing portion is a little off as well leaving me slightly overwhelmed by the icing and missing the flavor of the cake. Give Coco's a try if you're walking down Ellsworth.

Next stop, Dozen's Bakeshop. After I recover from the sugar overload.

Monday, July 27, 2009

New town, new tastes

Apologies for the delay. Since we last spoke I've traveled across the world and returned only to move to another state. The good eats have been abundant so there is a lot of catching up to do.

I am recently back from Southern Vietnam where I and the rest of our group provided chiropractic care to the needy. I wish I could say the food was the best part of the trip but I can only say it was an afterthought after many long days of sightseeing, relaxing at a beautiful resort, and of course sweating it out for patients in various hospitals. Some of the food was awesome but most of it not quite as exciting as you'd think. Vietnamese food has never been on the top of my list of preferred cuisines but I did have pho most mornings for breakfast, spring rolls at nearly every meal, fresh seafood, and enough fish sauce to drown in.

The real food highlight of the trip were the fruits. Instead of sweet dessert, every meal was followed with exotic fruits like dragon fruit, rambutan, mangosteen, lychee, and tropical variations of watermelons, oranges, bananas, and pineapple.

I hope to return to Vietnam in the future to truly explore the flavors of the region. Due to the size of our group and the circumstances, I think we missed out on a lot of the good eats of Ho Chi Minh City and Vung Tau.

We have said goodbye to Florida and relocated to Pittsburgh. Unfortunately (or fortunately) the food is so good here (and cheap!) that I find myself not cooking often. Because there is good food on every street, this blog may evolve into something a little different. I hope to share all of our Pittsburgh dining experiences here with you beginning in the days ahead.

Sunday, May 31, 2009

Favorite Chicken Curry of the Moment

Unfortunately my downstairs Indian neighbors have vanished. They left as mysteriously as they came. No moving truck, cars, or furniture. Poof. Vanished. Now I no longer come home to the sweet smells of their bustling little kitchen. Indirectly thanks to them, I am now better in the kitchen when it comes to Indian dishes. My new downstairs neighbors may now be tempted with the smells of curry from my upstairs kitchen.

This recipe has been tweaked a little based on my own trials and errors. I've gotten in the habit of pureeing all the base ingredients to improve the texture and richness. Ever since an incredible korma I had in Atlanta, I'm also hooked on adding golden raisins and almonds for a whole different experience.


Favorite Chicken Curry
adapted from My Husband Cooks

2 lbs boneless, skinless chicken thighs, trimmed of some fat and veins
1 1/2 cups plain yogurt
1/2 onion, roughly chopped
1 tblsp curry powder
1 1/2 tsp salt
1 tsp garam masala
3 cloves garlic
1 tblsp fresh ginger
1 serrano pepper (jalapeno works as well)

1 tblsp + 1 tsp curry powder (use a hot curry powder if you like more heat)
1 tsp garam masala
1 tsp chili powder
1/2 tsp red pepper flakes
1/2 tsp cumin
1/2 tsp turmeric
1/4 tsp cinnamon

14 oz can coconut milk
1 onion, chopped
2 serrano peppers, chopped (or jalapeno)
5 cloves garlic
1/2 cup dry white wine (or chicken broth)
1/3 cup slivered almonds
1/2 cup golden raisins
fresh cilantro

Don't be too frightened by the ingredients list! First marinade the chicken. Put all the pieces in a large ziploc bag and add the yogurt. In a food processor blend the first set of ingredients. Pour the puree into the ziploc bag and mix everything together to coat the chicken thoroughly. Let chicken marinade over night or for however long you have to spare.

When you're ready to cook, take the chicken out of the marinade and shake off the excess. If you have a grill, grill the chicken to simulate the tandoori oven. If not, cook the chicken under the broiler, pouring off excess fat to prevent the future sauce being too oily.

In a small bowl, combine the spice mix. Set aside.

In a large pot, using a neutral oil like ghee or some butter, saute the onion, peppers, and garlic until just soft and slightly caramelized. Once soft, remove the saute and puree in a food processor until you have a nice paste. Return the paste to the pot and stir in the spice mix. Cook for no more than a minute then pour in the wine (or broth) and scrape up the bits on the bottom of the pot. Once the wine reduces, add the can of coconut milk and stir to combine.

Let this simmer for several minutes on low heat so it thickens nicely. After 10 minutes add the raisins, almonds, a little cilantro. If the chicken is done you can either chop it into pieces or place it whole in the pot. Stir around at a low simmer so the flavors come together. Add salt to taste. Serve piping hot over some rice or with naan.

Note: This makes a ton of thick, delicious sauce. Save the leftover sauce for another meal. Serve it over cauliflower, paneer, or whatever other leftovers for a real treat. The raisins will zing as they pop in your mouth.

Saturday, May 30, 2009

Tired of Takeout

I'll be honest. I haven't been cooking much lately. It has gotten so bad that our favorite takeout guys recognize me on the street. They know where I live! I'm slowly coming back around. I just had some minor set backs. There was that week long illness that may or may not have been swine flu, the mysterious poison sumac incident, a bit of traveling, and don't forget about the 30 inches of rain.

This simple tofu dish can be made with ingredients you probably already have on hand. Replace the tofu with another protein if you prefer. You can throw this dinner together faster than that familiar takeout boy can make it to your door.


Sweet and Sour Tofu
adapted from Serious Eats

1 package (14-ounce) firm tofu
1 red onion, halved and sliced
1 bell pepper, sliced
1 jalapeño pepper, chopped
3 cloves garlic, coarsely chopped
3 tblsp white wine vinegar
3 tblsp soy sauce
1 tblsp honey
1 tblsp brown sugar
1 tsp cornstarch
1/2 tsp crushed red pepper flakes

Drain the tofu with a heavy dish on top with paper towels for at least half an hour, changing the paper towels now and then. The drier, the better. Slice the tofu into small cubes and fry them in a bit of oil until browned on all sides. Add the onion, peppers, and garlic and cook until just soft, about 5 minutes. In a small bowl combine 1/3 cup hot water with the vinegar, soy sauce, honey, brown sugar, cornstarch, and red pepper flakes. Pour this sauce over the tofu once the vegetables have softened and let it thicken for a minute or two. Serve with rice.

Tuesday, April 14, 2009

Four Minute Asparagus

Four minute asparagus. Now that is a little misleading. The four minutes refers to the cooking time but you might add another 5 minutes for prep. Nonetheless I have an easy side dish for you. Perfectly steamed asparagus spears are drizzled with a citrus oregano dressing and dotted with sweet orange segments. Did I mention that there is no cooking required? Just set 4 minutes on your microwave and you're done. The color stays vibrant and the texture still crisp. I may never turn on the oven for asparagus again.

Asparagus with Citrus and Oregano
adapted from Urban Italian

about 1 lb thick asparagus
1 navel orange + zest
1/4 tsp dried oregano
1 tblsp lemon juice
4 tblsp olive oil
2 scallions, green parts only, finely chopped
salt and pepper to taste

Zest the orange and set aside. To segment the orange, cut off each end then set on end and slice off the peel and pith. Cut the segments away from the membrane and put in a small bowl. In another small bowl collect any juice and squeeze remaining juice out from the pulp. In this bowl whisk 2 tblsp olive oil, scallions, oregano, lemon juice, and salt and pepper to taste. Set aside

Prepare the asparagus by cutting off the bottom 1" from the tough end. Place in a microwave safe dish and sprinkle the orange zest over top. Pour over 1 oz of water and 2 tblsp of olive oil. Cover tightly with plastic wrap and microwave for 2 minutes. Rotate dish and cook for another 2 minutes. Test for doneness. Remove plastic wrap and drain off liquid. Pour the dressing over asparagus and layer with orange segments. Serve hot or room temperature.

Monday, April 6, 2009

Shake the Beef

In my never ending attempt to find new ways to spice up steaks, I have found one that takes the cake. The Vietnamese dish bo luc lac (aka shaking beef) is so good I could eat it 3 times a week. Whenever tenderloin steaks are on sale, stock up so you can make this dish whenever you crave it. Thick flat-iron steaks would also work well for a cheaper alternative.

This version is taken from San Francisco's The Slanted Door. Chef Phan's restaurant was featured in this month's Saveur alongside some other great recipes I hope to try soon. I serve this either with rice or with boston lettuce. It goes wonderfully wrapped up in little lettuce packages and dipped in the heavenly lime pepper sauce.

Bo Luc Lac (Shaking Beef)
from Chef Charles Phan

1 lb beef tenderloin, trimmed and cut into 1" cubes
1 red onion, thinly sliced
2 cloves of garlic chopped
3 scallions, sliced thick
4 tsp ground black pepper
7 tsp sugar
1/4 cup rice vinegar
1/4 cup soy sauce
1 tblsp fish sauce
2 limes, juiced
1 tblsp butter

Prepare the beef in a bowl and sprinkle over it 2 tblsp oil, 1 tsp sugar, and 2 tsp pepper. Cover and let set at room temperature for about an hour or refrigerate overnight. In a small bowl mix the soy sauce, rice vinegar, fish sauce, and 2 tsp of sugar. Set aside. In another small bowl prepare the dipping sauce, juice the limes and add 4 tsp sugar and 2 tsp pepper. You will have to work quickly and in batches so have all other ingredients prepared and nearby.

Remove the beef from the bowl and pat dry with paper towels. Heat 2-3 tblsp oil in a wok or large skillet. Heat until smoking. Working in batches, add half of the beef and cook until each side is quite brown, 2 minutes, but still medium rare. Add half of the onions, scallions, and garlic stirring constantly for 1 minute. Pour in half of the soy/vinegar mixture and butter and continue to stir for another few seconds. Pour out onto a platter. Heat some more oil until smoking and repeat.

Thursday, April 2, 2009

Teased with Turmeric

I have new neighbors. I think they cook constantly. At breakfast, lunch, and dinner I go outside or open the windows to the smell of Indian spices wafting up toward my nose. I find it terribly unfair that they haven't invited me over for dinner. Little do they know my love hate relationship with Indian food. I love to eat it but hate to cook it because I can never make it nearly as well as my favorite restaurants.

The mouth-watering temptation day in and day out has taken its toll. With no decent take-out place or buffet within a 100 mile radius, I decided to give it yet another try. I admit, things are going well. P has to agree that I'm getting much closer at creating above average Indian dishes.


Mattar paneer is always my go-to dish. Its not the most exciting thing out there but in my mind its a good test of a restaurant's quality. It is quite easy to put together in this version, but my only complaint was the level of spiciness. I need a little heat (or a lot) in a dish like this and I was a little clueless on what to add to achieve that. Cayenne? Red chili powder? A small, hot pepper?

Mattar Paneer
adapted from Cuisine Cuisine

2 medium onions, chopped
1 1/2 tsp cumin
2 1/2 tsp cinnamon
2 tsp coriander
1/4 tsp turmeric
1 tsp garam marsala

1 lb paneer, cut into cubes
2 cups frozen peas
3 tblsp tomato paste
4 tblsp plain yogurt
1 tblsp grated ginger
1 tblsp minced garlic
salt and pepper to taste
cilantro

Ahead of time, lightly fry the paneer cubes in ghee or oil until browned on each side. Set aside.
Heat some ghee or oil in a large dutchoven and fry the onions until nicely browned and charred a bit. Add the spices and stir for a few seconds. Add more oil if it becomes too dry. Remove the contents of the pot to a food processor and puree with the garlic and ginger. Return the paste to the pot and add the tomato paste and stir for a minute. Pour in a scant 1/2 cup of water to deglaze the bottom and scrape up any bits. Stir constantly until it smooths out and then add the yogurt. Let it simmer for a few minutes then add the peas and paneer. Bring to a simmer and put a lid on it to steam the peas for a couples minutes. You may need to add more water if the heat is too high and its not coming together. Add salt and pepper to taste. Stir in some chopped cilantro and serve with basmati rice or naan.

Tuesday, March 17, 2009

Spice up your Steak

Normally I'm a purist when it comes to steak. All I want is a nice meaty cut cooked to a perfect medium rare. But alas, beef just doesn't taste like much these days. Could it be the massive amounts of corn, hormones, and who knows what else that gets pumped into our cows? I even find that the organic or free range stuff is pretty bland at best. Where is the beefy tasting beef?

Actually, I'm probably not even old enough to remember a time when beef was flavorful. Until the day comes when cows start to taste like cows (wishful thinking!), I'll just have to come up with creative ways to serve steaks. I came across this recipe in an effort to spice up some filet mignon. This sauce is rich and creamy with a nice spicy kick from the chipotle chiles. I must admit I read this and thought it sounded weird, but after one bite I was in love with the flavors. Try it on any cut of beef or even chicken.


Filet Mignon with Gorgonzola Sauce
adpated from Bon Appétit 2007

2, 1/2 lb filet mignon
8 oz shitake mushrooms, stemmed and sliced
1 clove of garlic, minced
1 chipotle chile, finely chopped + 1 tsp of adobo sauce or to taste
1/4 cup crumbled Gorgonzola cheese
1/4 cup heavy cream

In a small saucepan, saute mushrooms until slightly soft. Add the garlic and cook until fragrant. Pour in the cream and bring to a boil. Reduce the heat and stir in the Gorgonzola and chile. Stir to combine and season with salt and pepper to taste. Add more adobo sauce if needed. Set aside. In a larger oven safe skillet, sear one side of seasoned steaks, turn and finish in a hot oven. Cooking time will depend on thickness and desired doneness. You could do these on the grill for more smokey flavor. Pour the sauce over the steaks and serve immediately.

Monday, March 9, 2009

Flourless Chocolate Cake

You probably don't own a springform pan. After you read this you will want to go buy one. This is my new go-to cake. It can be whipped up in less than 10 minutes and will emerge as a really impressive dessert in less than an hour. Look how dense and decadent!

The best thing about this recipe is its flexibility. You can spice it up with ground nuts, a shot of liqueur or espresso, baked in cherries, or various cocoa content chocolate. Did I mention that this dessert is good for you? Loaded with antioxidant-rich dark chocolate, you will feel less guilty about this 'death by chocolate.' I take it one step further by using omega-3 eggs and raw cane sugar. This is almost health food!

Flourless Chocolate Cake
seen on TAG and the Gourmet Cookbook

2 sticks butter
2 bars of 60% cocoa baking chocolate (8 oz)
6 eggs
1 1/2 cups sugar
1 cup cocoa powder (or 1/2 cup reg cocoa powder + 1/2 cup dutch process cocoa powder)

Prepare a 9" or 10" springform pan by cutting a round of parchment to the size of the pan. Use some butter or nonstick spray to place the round in the pan. Preheat the oven to 350. In a makeshift double boiler (i.e. heat-safe bowl over a small saucepan of water), melt butter and chocolate, stirring occasionally. This can probably be done in the microwave as well -- nuking in intervals so as not to seize the chocolate. Take the bowl off the boiler and stir in the sugar. Add the eggs one at a time. Finally, stir in the cocoa powder and any additional ingredients here. Pour into the prepared pan and bake for about 50 minutes or until a toothpick comes out with a few crumbs. Let cool completely before serving. Goes great with vanilla bean ice cream and a sweet dessert wine.

Monday, February 23, 2009

Basic Tomato Sauce

There are just some recipes that every cook should know. These are a cook's 'go to' recipes that can be whipped up in your sleep to rave reviews. I make a mean flank steak and salmon bulgogi, but sometimes I forget about simpler dishes. Since spaghetti is such a weeknight mainstay, one of the first things I should have learned to make was tomato sauce. I used to pick up any jar of sodium-laden red sauce but never again!

Tomato sauce and spaghetti dishes never used to wow my tastebuds. I've never dreamt of the perfect bologonese. This recipe changed all that. It may change your life too. It changed Adam Roberts' life after all, just read the first chapter of his book. Try it and you too will be a believer in tomato sauce. This recipe comes from Mario Batali but you don't need any fancy Iron Chef technique to make it. Just simmer and stir. It makes a lot of sauce so store it up in jars, freeze it, keep it in the refrigerator for a week.

Basic Tomato Sauce
Mario Batali's Babbo Cookbook

1 onion, finely chopped
4 cloves of garlic, finely chopped
1 carrot, finely shredded
2 28 oz cans of crushed tomatoes (I buy fire roasted for added flavor)
1 tblsp dried thyme (or 3 tblsp fresh)
salt and pepper, to taste

In a large pot heat about 2 tablespoons of olive oil. Once hot, add the onion and cook until just beginning to brown. Add the garlic and cook for another minute or until fragrant. Add the carrot and thyme and cook a minute more. Pour in the crushed tomatoes and combine everything together -- scraping up any bits off the bottom of the pot. Bring to a boil and stir often. Reduce to a low simmer and let it sit for at least 30 minutes. It should reduce quite a bit and get very thick. Finally, season with salt and pepper. If you prefer a smooth sauce, blend the sauce in batches. Add meat for a meat sauce or mushrooms, peppers, etc to be ladled over your pasta dish.

Saturday, February 7, 2009

How to: Wine and Cheese

I just hosted my first wine and cheese party to great success. I have mild knowledge of wine but zero knowledge of cheese. This little event forced me to learn quite a bit about cheese. It always helps to find a good cheese monger to help you even more with this task. I ventured to Winter Park's Cheese Shop of Park for some expert help. The husband and wife team really know their stuff and everything is easily tasted and cut to your liking. In addition, I was able to pick up large portions of five different cheeses for a very reasonable price. Check out the Cheese Shop on Park if you're ever in the Orlando area.

Things to Keep in Mind:
1 How many guests do you anticipate?
It is recommended that you allow least 1 oz. to taste per person.

2 What are the cheese preferences of your guests?
Some people have an aversion for stinky cheeses, blue, or goat. Keep this in mind and pick milder varieties that the majority will enjoy.

3 What are the wine preferences of your guests?
Do they mainly drink whites/reds? Do they prefer California wines? In general, pick lighter-bodied wines that will not overwhelm the cheese or the palate.

Five Rules of Thumb:
1 Pick no more than 4 cheeses. It is easy to want to try a half a dozen cheeses but too many can easily overwhelm the palate and take away from the whole experience.

2 Always serve cheese at room temperature. This allows the cheese to soften and the flavors to fully ripen.

3 Regions normally go together. If a wine is from France and a cheese is from France, they are more likely to complement one another. There is obviously some exception here.

4 Acidic cheeses tend to go with acidic wines. Buttery cheeses tend to go with wines of the same taste and texture. Hard, saltier cheeses go best with robust and fruity reds. Stinkier cheeses can be mellowed with sweeter whites like Riesling or Sauternes.

5 There is no single wine that will pair with every cheese. If you had to only pick two, I would suggest a Gerwuztraminer and a fruity Cab or Bordeaux.

Here are the cheeses we sampled served with a Napa Cabernet and a South African Chardonnay crisp with green apple.

Saint Andre Triple Crème (France) Made from fresh cow’s milk and enriched with pure cream. Bloomy white edible rind, soft creamy center. Rich and buttery.

Combozola Blue Brie (Germany) Another triple crème from Bavaria that is like a marriage of Camembert and Gorgonzola (hence the name). Mild and creamy, spreadable even, with a flavorful rind.

Prima Donna (Holland) A cow's milk cheese made in the style of a gouda. Wonderfully nutty with a crunchy, crumbly texture.

Piave (Northern Italy) A cow's milk cheese named after the Piave River. Full-bodied and reminiscent of Parmigiano Reggiano but maybe even better. Went incredibly well with white truffle honey!

Pecorino Al Tartufo (Italy) A young sheep's milk cheese that is much softer than the aged pecorino most are accustomed to. Speckled with black truffles which accompany the buttery texture.

Wednesday, January 21, 2009

Homemade Pudding

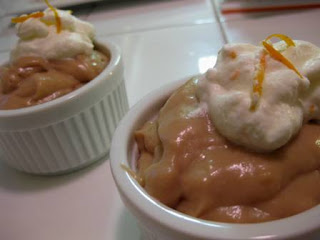
When I told my mom that I made butterscotch pudding from scratch, she said "oh I didn't make anything gourmet like that tonight." I came back with, "what's so gourmet about pudding?" The more I thought about it, the more I realized that yes, this is gourmet pudding. This pudding is so far ahead of those plastic pudding cups of our school lunch memories. If the world knew how easy it was to make pudding without a powdered mix or a trans-fat laden cup, maybe everyone would be making gourmet pudding.

This recipe from the latest issue of Gourmet is pudding for grownups. The flavors are rich and complex; the texture perfect. With just some simple whisking you can have homemade pudding in minutes. It is near magical. Plus this is almost a guilt-free dessert which can be made entirely with antioxidant rich brown sugar, and low-fat, organic dairy.

Butterscotch Pudding with Orange-scented Cream
adapted from Gourmet February 2009

1/2
cup packed dark brown sugar
2 tblsp + 2 tsp cornstarch
1 1/2 cups milk (organic EPA/DHA + reduced fat)
1/2 cup heavy cream (organic)
2 tblsp unsalted butter, cut into bits
1 tsp vanilla extract

1/2 cup whipping cream
2-3 tblsp confectioner sugar
zest of 1 orange, finely chopped

In a heavy pot, off the heat, whisk together sugar, cornstarch, and 1/4 tsp salt. Put pot on medium heat and pour in the milk and cream. Whisk over medium heat for several minutes to dissolve the sugar. The mixture will be thin but as it comes to a boil will thicken rapidly. Once at a slow boil, continue for 1 minute then immediately take off the heat and whisk in butter and vanilla. Scoop into ramekins or a large bowl and place in the refrigerator to chill for at least 2 hours. Gourmet recommends using a sheet of buttered wax paper over the surface of the pudding. I think this is to prevent the inevitable 'pudding skin' but if you're a fan of pudding skin you can skip this step. I skipped it and just remixed everything together before serving.

Serve with freshly whipped cream sweetened with some confectioner sugar and the zest of an orange. You might consider making a double recipe because it won't last long after that first taste.

Sunday, January 11, 2009

Madeleines

The madeleine. Such a simple little cookie yet so difficult to perfect. Tender cake on the inside. Crisp edges on the outside. My first attempt was a complete failure. The second time around was near perfect. With some more practice I might just master this little cookie.

Lemon Glazed Madeleines
adapted from Martha Stewart Cookies
makes 2 dozen cookies


1 1/2 cups cake flour
1/2 tsp baking powder
1/4 tsp coarse salt
3 eggs plus 2 yolks
3/4 cup sugar
1 tsp vanilla extract
2 tblsp lemon zest
2 tblsp lemon juice
1 1/2 sticks melted butter

For the Glaze:
3/4 cup confectioner's sugar
1 lemon zested and juiced

Sift the dry ingredients in a small bowl. In the bowl of an electric mixer add the eggs, sugar, vanilla, zest and juice. Mix with a paddle attachment for 5 minutes. The batter will get pale and thicken slightly. Mix in butter. Fold the dry ingredients in batches until combined. Let the batter rest for at least 30 minutes before baking.

Preheat the oven to 350. Grease your madeleine pan with butter using a pastry brush. Spoon or pipe the batter into the molds only filling each up 3/4 of the way or less. Bake for 7-8 minutes or until the edges start to crisp. Let cool slightly then turn out on wire rack.

To make the glaze, combine the sugar, lemon zest and juice in a small bowl and stir to dissolve. Lightly brush the glaze over the cooled cookies with a pastry brush and let harden before storing.

Unfortunately these cookies are best the day they're made and quickly lose their flavor the day after. So have a huge tea party and whip up a batch! (Here is a great picture step-by-step of making these using a slightly different recipe.)

Friday, January 9, 2009

a new addiction

While many are giving up their vices this coming year, I have acquired a new one -- truffles. A truffle addiction isn't necessarily a bad addiction to have, but it is arguably much more expensive than smoking or alcohol. You see I haven't been right since the 'truffle explosion' that took place at Alinea a couple months back. Since then I can still taste truffles and I'm always wanting more.

I sometimes get asked what a truffle tastes like. It's really hard to describe. It's not mushroom-y. It's not dirt like and it's certainly not chocolately. How do you describe truffles? The only thing I can think of is pure umami -- that elusive fifth taste scientists can't quite wrap their brains around. Truffle is a taste that lingers and once you taste it, your tongue and brain will remember it forever.

Since truffles are difficult to find and totally impossible to afford, I've been getting my fix from truffle-studded cheeses. With every grocery store I enter, I first stop by the cheese case. So far I've found three cheeses that are quite wonderful and appear to be readily available. In order of greatness...

Boschetto Al Tartufo Cheese
A blend of cow's and sheep's milk to form a firm and moist cheese. This one won best cheese in the 1998 French Cheese show and I think I'd vote for it every time. It is hands down the best I've tried. Immensely flavorful, wonderful texture, and the taste lingers on and on.

Carr Valley Black Sheep Truffle Cheese
A sheep's milk cheese that is quite soft. This one is flecked with black truffles, soaked in truffle oil, and aged 6 months. I've found that Carr Valley really makes fabulous, award-winning cheeses across the board. I'm sampling the cocoa goat right now. yum!

Monti Trentino Caciotta Rustega with Truffle
Another Italian cheese made entirely from cow's milk. This is my least favorite but it is still very good. The truffle flavor here is less intense than with the other two. It isn't aged nearly as long making it more subdued and mild.

So next time you host a wine and cheese consider splurging a little and putting a truffle-studded cheese on your cheese board. Your guests' taste buds will get the ride of their life.

Wednesday, January 7, 2009

cheating

I'm all for the whole 'no-knead' bread movement. However, when life throws you a bread machine you just have to use it. You're probably thinking "ugh bread machines make oddly square shaped tasteless, crumbly balls of dough," and sometimes that is the case but the best thing about bread machines is that they do all the kneading and mixing for you and you can bake however you like.

I always make challah bread during the holidays. I make it because it is super easy in a bread machine but now that the whole no-knead challah is out there I will have to try the alternative to see which tastes better.


Bread Machine Challah

3/4 cup milk
2 eggs, beaten
3 tblsp butter softened
3 cups bread flour
1/4 cup white sugar
1 1/2 tsp salt
1 1/2 tsp bread machine yeast

Place all ingredients into the bread machine pan in the order above. Select Basic Bread and Light Crust settings then press Start. How easy is that?! Now the secret is to take the dough out 1.5 hours into the mix cycle. Take the dough out and place it on a lightly oiled surface. Form into a long roll of dough. Cut the dough into equal thirds, form into three long rolls, and braid. Tuck the ends under so you have a nice tight braid and set on a parchment lined pan to rest. Let rest for at least 30 minutes then bake at 350ish until golden, about 12 minutes. You can apply an egg wash if you like or brush with butter when it comes out.

If you're feeling more adventurous, you can try the nutella swirl variety.


Follow the same steps as above. When you cut the dough into thirds and lengthen them out, slice a slit down the middle of each third and pull it apart a bit. Now spread nutella generously down the middle of each third and seal up the sides by pinching them together. You don't want nutella escaping just yet. When done, braid as before. Let rest, then sprinkle hazelnuts on the top and bake the same as above.